| View previous topic :: View next topic |
| Author |
Message |
Jeffrey Kafer
Assistant Zookeeper

Joined: 09 Dec 2006
Posts: 4931
Location: Location, Location!
|
 Posted: Sat Jun 16, 2012 1:19 am Post subject: Looking for the best DIY acoustic panel instructions Posted: Sat Jun 16, 2012 1:19 am Post subject: Looking for the best DIY acoustic panel instructions |
 |
|
Wanna make my own panels, because I have unique sizes. I've Googled and found some good DIY frames with Corning 703, but I want to know if there's a specific set of instructions our experts recommend.
Also, 2 or 4 inch for a closet?
_________________
Jeff
http://JeffreyKafer.com
Voice-overload Web comic: http://voice-overload.com |
|
| Back to top |
|
 |
todd ellis
A Zillion

Joined: 02 Jan 2007
Posts: 10542
Location: little egypt
|
| Posted: Sat Jun 16, 2012 6:21 am Post subject: |
|
|
I'm no expert ... But I'd say a simple 1x ... Whatever the thickness of your foam pine frame covered in burlap or some other porous material with a French cleat for hanging would do nicely. You should be able to make one in about 1/2 an hour.
_________________
"i know philip banks": todd ellis
who's/on/1st?
 |
|
| Back to top |
|
|
Bish
3.5 kHz

Joined: 22 Nov 2009
Posts: 3738
Location: Lost in the cultural wasteland of Long Island
|
| Posted: Sat Jun 16, 2012 6:45 am Post subject: |
|
|
I scoured the internet and the important places (here, specifically Mike Sommer's input) and came up with, what was for me, the simplest design. OC703 in 48x24x2 & 4x1 from local hardware store, burlap found on-line. The frames were cut to fit the panels' existing size, but there's no reason why the frames can't be made and the panels cut to fit. The most important "design" part of my whole project was using corner braces where the 4x1 was butt-joined. Correctly placing these triangles 2 inches from the front edge of the frame also allows them to act as stand-offs allowing the OC703 to sit at the front of the frame, allowing for a nominal 2" air gap behind. Cover the front and sides with burlap and you're good to go (I used a stapler to secure them) . I hung them with keyhole slots, but French cleat is good as well. I also used the same design principle to make the superchunks® for the corners, although these were more to give the same look on the front... the backs were stuffed with stacked OC703 triangles.

_________________
Bish a.k.a. Bish
Smoke me a kipper... I'll be back for breakfast.
I will not feed the trolls... I will not feed the trolls... I will not feed the trolls... I will not feed the trolls. |
|
| Back to top |
|
|
Bruce
Boardmeister

Joined: 06 Jun 2005
Posts: 7980
Location: Portland, OR
|
| Posted: Sat Jun 16, 2012 7:31 am Post subject: |
|
|
I've looked at the tech specs for 2" foam versus 4" foam, and the 4" is usually only marginally better. You can also get various densities of foam and once again the increase in sound deadening as you go up in densities is small.
I guess you have to guess how "dead" you want it to be and afford what you want to afford.
B
_________________
VO-BB Member #31 Enlisted June, 2005

I'm not a Zoo, but over the years I've played one on radio/TV. . |
|
| Back to top |
|
|
Monk
King's Row

Joined: 16 Dec 2008
Posts: 1153
Location: Nestled in the Taconic Hills
|
| Posted: Sat Jun 16, 2012 9:22 am Post subject: |
|
|
Roxul rigid 60 comes in 24x48" panels, you can use 1x2 lumber with a french cleat to hang it. It's numbers are just as effective as Owens Corning, and about a third of the price.
I got my burlap from the local Agway, it was really cheap!
http://www.voiceofmonk.blogspot.com for assembly instructions along with pictures and designs from Mike.
_________________
Company, villainous company, hath been the spoil of me...
www.monksvoice.com |
|
| Back to top |
|
|
Jan Anderson
Contributore Level V

Joined: 14 Mar 2011
Posts: 179
Location: Healdsburg, Ca.
|
| Posted: Sat Jun 16, 2012 9:45 am Post subject: |
|
|
Hi Jeffrey - I just made 16 of my own panels, using rockwool as the wideband absorbant material, and they came out looking and working GREAT!
PM me if your like me to tell you how I went about it. I also took a few pics of the process that I'm happy to share.  |
|
| Back to top |
|
|
ricevoice
Cinquecento

Joined: 28 Dec 2007
Posts: 532
Location: Sacramento, CA
|
| Posted: Sat Jun 16, 2012 10:10 am Post subject: |
|
|
If you don't have the time to make them yourself (or if you're like me and have no carpentry skillset) ATS Acoustics does custom panels too:
http://www.atsacoustics.com/cat--Custom-Acoustic-Panels--112.html
Not sure how the cost of the custom ones compares to the normal orders but I'm a fan of their products in general and they've always seemed very reasonable priced to me.
_________________
Chris Rice - Noisemaker
www.ricevoice.com |
|
| Back to top |
|
|
Jeffrey Kafer
Assistant Zookeeper
Joined: 09 Dec 2006
Posts: 4931
Location: Location, Location!
|
| Posted: Sat Jun 16, 2012 10:34 am Post subject: |
|
|
| Jan Anderson wrote: |
PM me if your like me to tell you how I went about it. |
I'd love to see it. Howzabout posting it here so the rest of the class can hear, too.
_________________
Jeff
http://JeffreyKafer.com
Voice-overload Web comic: http://voice-overload.com |
|
| Back to top |
|
|
Deirdre
Czarina Emeritus

Joined: 10 Nov 2004
Posts: 13026
Location: Camp Cooper
|
| Posted: Sat Jun 16, 2012 11:48 am Post subject: |
|
|
I use the 2" 703-style rigid insulation which I covered with upholstery fabric.
You can cut this stuff by using a box cutter you put a couple of pieces of 2 x 4 on either side of the line you want to cut, kneel on the pieces to compress the insulation, and stroke with the box cutter a couple of times to make the cut.
This image shows 1 board, I use 2.
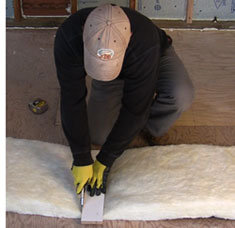
You can cut these into any size.
Then make some simple pillowcase-style covers of sturdy fabric.

I hang these like picture frames with cords attached to the back.

_________________
DBCooperVO.com
IMDB |
|
| Back to top |
|
|
Jan Anderson
Contributore Level V
Joined: 14 Mar 2011
Posts: 179
Location: Healdsburg, Ca.
|
| Posted: Sat Jun 16, 2012 12:39 pm Post subject: |
|
|
Well Jeffrey, what I used for framing was 1"x2" fir (or pine) ferring strips that I cut to the propper dimension for the rockwool (Roxul) bats and glue/nailed together. I used a finish nail gun to make it go quickly although a screw gun would work fine too. You probably have to predrill the wood though, to prevent the screws from splitting the boards. Then I used burlap that I bought from Joanne's Fabrics and staple gunned the burlap to one side of the frame. Next, laying a bat of the rockwool down onto the burlap and covering it with the premade frame and pulling the fabric around and stapling it as shown in the pics. Trim up the burlap neatly and throwin another staple or two to tity things up and they're ready to hang.
For the ceiling-hung panels, I used screw eyes and drywall anchors into the ceiling and short (2 1/2") gate hooks screwed into the panels. For the wall mounted panels, I just used screw eyes and picture wire.
With the exception of the burlap, I bought all my materials at Home Depot, including the rockwool bats. They were a special order and there was a minimum of 3 bags. Each bag had 8 bats and only cost about $35 per bag.
I found it to be a very fun and rewarding little project, and it saved me a BUNCH of green too.


Hope that helps give you the idea of my method.
Last edited by Jan Anderson on Sat Jun 16, 2012 2:20 pm; edited 1 time in total |
|
| Back to top |
|
|
Monk
King's Row
Joined: 16 Dec 2008
Posts: 1153
Location: Nestled in the Taconic Hills
|
| Posted: Sun Jun 17, 2012 6:39 am Post subject: |
|
|
Dierdre, those are beautiful!
Nice fabric choices.
That's about as simple as you can get, get some rigid fiberglass or rockwool, and wrap them in fabric of your choice. And when you move, they can move with you quite easily.
_________________
Company, villainous company, hath been the spoil of me...
www.monksvoice.com |
|
| Back to top |
|
|
Diane Maggipinto
Spreading Snark Worldwide

Joined: 03 Mar 2006
Posts: 6681
Location: saul lay seetee youtee
|
| Posted: Sun Jun 17, 2012 6:42 am Post subject: |
|
|
what is the best way to hang wall panels to ensure they're not flush against the wall ... that is, allowing for a couple of inches of space between the panel back and said wall?
_________________
sitting at #8, though not as present as I'd like to be. Hello!
www.d3voiceworks.com |
|
| Back to top |
|
|
Frank F
Fat, Old, and Sassy

Joined: 10 Nov 2004
Posts: 4421
Location: Park City, Utah
|
| Posted: Sun Jun 17, 2012 11:03 am Post subject: |
|
|
To create the separation from wall to panel (suggested 2") place two 1" X 2" board horizontally behind the panel (the top most panel will have two holes for dowels drilled). Add some felt or other non-abrasive material on the edge meeting the wall to protect the paint.
Next, place another short 1" x 2" board with two holes for wooden dowels on the wall in the center of where you desire to hang the panel. Place the panel and add the dowels. Now you have the panels hung and spaced properly.
Or, use heavy wire attached to the spacer boards and picture hooks to attach.
Another suggestion, if using 603, consider just covering the insulation panel without wood frames with fabric. Add the spacer and hang like a picture. They are lightweight and look nice.
Frank F
_________________
Be thankful for the bad things in life. They opened your eyes to the good things you weren't paying attention to before. email: thevoice@usa.com |
|
| Back to top |
|
|
Deirdre
Czarina Emeritus
Joined: 10 Nov 2004
Posts: 13026
Location: Camp Cooper
|
| Posted: Sun Jun 17, 2012 12:30 pm Post subject: |
|
|
I had the great good fortune of being in LA long enough to spend some quality time in the garment district, buying fabulous fabric remnants.
Upholstery fabric is great for covering rigid insulation for all the reasons Monk said and thanks for the compliments! Just because it's utilitarian doesn't mean it has to be dull.
_________________
DBCooperVO.com
IMDB |
|
| Back to top |
|
|
Frank F
Fat, Old, and Sassy
Joined: 10 Nov 2004
Posts: 4421
Location: Park City, Utah
|
| Posted: Sun Jun 17, 2012 1:56 pm Post subject: |
|
|
+1 for Deebs.
F2
_________________
Be thankful for the bad things in life. They opened your eyes to the good things you weren't paying attention to before. email: thevoice@usa.com |
|
| Back to top |
|
|
|

